Dawn
More actions
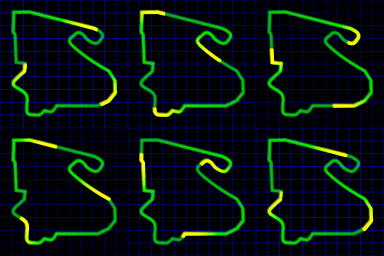
Dawn is the first new track added to San Francisco Rush 2049: Tournament Edition, and is one of the most difficult tracks to race. Unlike the other tracks, it features a sequential order of shortcuts that players must make available by driving over switches that open the next shortcut. Because of this, the three laps needed for an optimal fast time are all driven differently from one another, and failing to trigger a switch will prevent the player from accessing the rest of the shortcuts. The coin placement is also different from most tracks, in that players do not have to explore the way they have for the previous tracks, but instead need to execute each shortcut correctly to obtain all 100 coins.
The track starts on a hill on Parkmerced, followed by a winding road that takes the driver through Stonestown Mall. It then continues passed several residential districts; Saint Francis Wood, and Diamond Heights. After Noe Valley, is a quick right turn that takes the driver onto a bridge directly over Mission bay. Drivers must then decide which of the two roads on Bay View, that later converge right before Potrero Hill. Passed Potrero Hill is a large right turn, followed by a left turn along Portola. Nearing the end of the lap is Excalibur (not a real location in San Francisco,) followed by a drive through Inglewood that takes the driver directly to the finish line.
Fast Times Strategy
Special Edition
On lap 1's race start, stick to the road as much as possible. After the first right turn, cut across the concrete and take the orange and blue ramp at the end of a dirt trail. Then, land diagonally inside of a building and drive over another small ramp. Drive over the STV logo at the end of the narrow parking lot. Cut across the grass on the corner of the right turn and drive over the bridge. veer to the right slightly and to go over another ramp and aim a bit to the right to land on the rooftop of a building. From here drive forward; it will lead to leaping over the gap of two buildings and heading down a ramp, passed the ramp is another STV logo. Drive through it and the banked tunnel, drive without taking further shortcuts until lap 2.
On lap 2, drive normally until you get to the first right turn, veer to the right to enter a large train station with rounded walls. Drive up the rounded walls toward the left to perform a loop and exit the building along a suspended platform that goes over the main road. At the end of this platform is a building with a gap, drive through the gap to enter the building and toggle the STV switch. After exiting that building, align with the concrete on the left side of the road, and veer a bit toward the right, driving passed the animated arrow sign pointed right. Land on the narrow green platform, then onto the much larger one. Make a right and take the ramp, driving over another STV logo. After landing, perform similar maneuvers to the previous lap for driving into the banked tunnel; Instead of driving down a a ramp to get to the tunnel, drive slightly to the right of the ramp to drive through a pillar, then to the left onto another building before making it down toward the banked tunnel. Heading toward Excalibur, turn slightly right to position onto rooftops that lead toward a sewer. Drive into the sewer, and upon exiting drive over the STV logo on the ground. After exiting the sewer, drive toward the raised left part of the dirt ramp at the end.
For lap 3, land onto the raised train rails after taking the dirt ramp jump in lap 2. While up here, take a right to enter and Aquarium. After landing inside, drive over the STV logo and continue straight. Drive on the main road until the second Checkpoint, the make a slight right turn into a now open area cuts a cross a large part of the track. Drive into this area by taking a jump that goes over a dock and land onto a large green boat in the water. After landing on the boat, turn to the right to land back on the main track. Finish the race by following the main road.
The current record run in Team Rush, by Cobra427:
Coin Locations
This is the only Track where all coins can be collected by executing all of the shortcuts during a race. As such they are in order of acquisition during the entire race instead of lap.
Diamond Heights - 12 Coins
- 12 coins in a line after the first ramp shortcut on lap 1
Mission -18 Coins
- 12 more coins in a line right after the first 12 on lap 1
- 6 more coins in a spread out line right after the last set of coins on lap 1
Portola - 8 Coins
- 8 coins in a line inside the black and orange banked tunnel on lap 1
St. Francis Wood - 12 Coins
- 12 coins in a line along the left wall of the train loop exit on lap 2
Diamond Heights - 12 Coins
- 12 more coins in a line at the end of the same platform as the previous coins on lap 2
Noe Valley - 12 Coins
- 12 more coins inside of a building after leaping across the last platform on lap 2
Potrero - 6 Coins
- 6 Coins on a large yellow ramp on the roof of a large building on lap 2
Ingleside - 6 Coins
- 6 coins inside the Sewer tunnel on lap 2
Stonestown - 8 Coins
- 8 coins inside the Aquarium on lap 3
Mission - 6 coins
- 6 coins on concrete right before a dock on lap 3
Ingleside - Unobtainable Coin
- behind a fence on the right side of the road
Switch Events
Each STV switch is located at the end of the preceding shortcut and unlocks the next one:
- 1 - At the end of a narrow parking lot on Mission
- 2 - Before the banked tunnel entrance on Portola
- 3 - At the exit of the building in Noe Valley
- 4 - At the top of the large ramp in Potrero
- 5 - At the end of the Sewer shortcut in Ingleside
- 6 - At the exit of the Aquarium in Stonestown

